
Contents
If you’re dealing with a ceiling leak, you need to know how mold can develop, where it hides, and what an inspection report should show. You’ll want to identify the warning signs early, understand how inspectors test moisture and air, and know when urgent sampling is justified. The findings can affect repairs, documentation, and claims, so the details matter more than you might expect.
Key Takeaways
- Stop the leak first, then inspect for mold to prevent further ceiling damage and spreading contamination.
- Look for stains, musty odors, damp drywall, and dark insulation around leak paths as mold warning signs.
- Check hidden areas like attic insulation, drywall seams, and joists with a moisture meter and visual documentation.
- A proper mold report should note affected rooms, moisture readings, visible growth, photos, and suspected moisture sources.
- Use the report to guide cleanup, material removal, repairs, and insurance or landlord claims with dated evidence.
What to Know Before a Ceiling Mold Inspection
Before you inspect a ceiling for mold, you should first identify and control the source of moisture, since mold growth usually follows leaks, condensation, or past water intrusion.
You’ll get the most accurate results when you prepare a pre inspection checklist that includes access to the affected room, lighting, a ladder, a moisture meter, and documentation tools.
Confirm your homeowner responsibilities before anyone enters the space: protect belongings, provide utility access, and disclose any prior repairs or known water events.
You should also keep the area undisturbed, because cleaning or painting can mask evidence and weaken the inspection.
If you share these basics with the inspector, you’ll help your team work efficiently and make informed decisions about the ceiling condition.
Signs Your Ceiling Leak Caused Mold
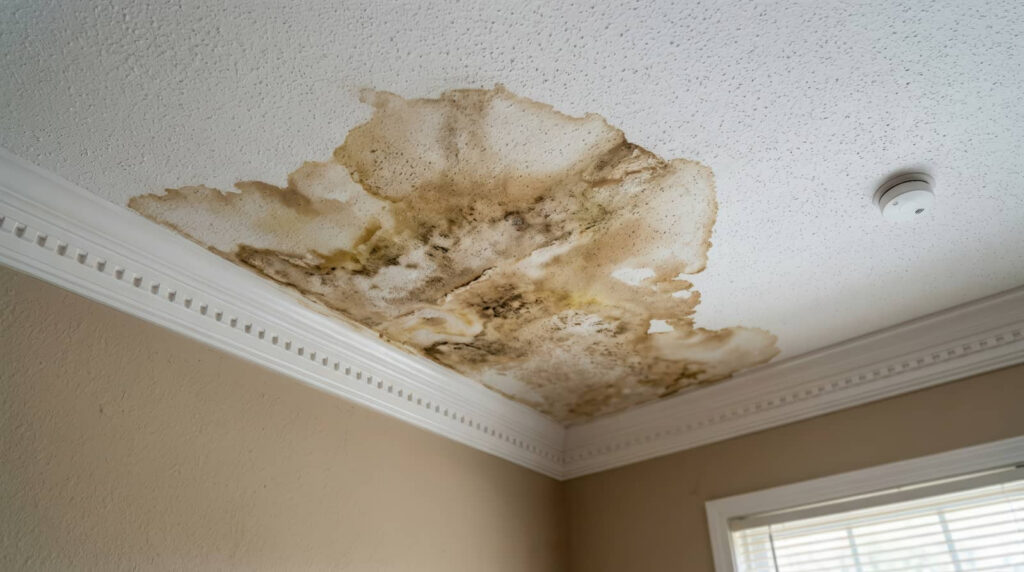
You can often identify ceiling mold by visible stains, dark spots, or irregular discoloration around the leak area.
You may also notice a musty odor and persistent dampness, which suggest active moisture retention behind the ceiling surface.
If these signs are present, you should inspect the affected area promptly for mold growth.
Visible Stains And Spots
Visible stains and spots often provide the clearest early evidence that a ceiling leak has promoted mold growth. You’ll usually see ceiling discoloration as yellow, brown, gray, or black patches that spread around the leak path or along drywall seams.
These marks may look sharp-edged, irregular, or speckled, and they often darken over time. If you notice clustered spots, treat them as active warning signs, not cosmetic flaws. Document their size, color, and location so you can track changes during inspection.
Then you can support mold prevention by correcting the water source quickly and limiting further material damage. In a well-informed community, you’re not overreacting when you act on visible staining; you’re using reliable evidence to protect the structure and everyone in it.
Musty Odors And Dampness
Musty odors and persistent dampness often indicate hidden mold growth after a ceiling leak, even when staining is minimal. You may notice musty smells first in enclosed rooms, closets, or attic-adjacent spaces where airflow is limited.
Check for damp surfaces on drywall, trim, insulation, and insulation-backed materials, since moisture can remain trapped after the visible leak stops. When relative humidity stays elevated, mold spores can colonize within 24 to 48 hours.
Use a moisture meter and inspect around fixtures, seams, and ceiling penetrations to confirm wet materials. If the odor intensifies after HVAC use, you’re likely moving contaminated air through the space.
Address the source quickly so you can keep your home healthy and restore a safe, familiar environment.
Where Ceiling Leak Mold Hides
You’ll often find ceiling leak mold in attic insulation, where trapped moisture stays hidden and supports growth.
Check drywall seams closely, since water can enter these joints and spread mold behind the surface.
Focus on these areas first because they commonly retain moisture after a leak.
Attic Insulation
Attic insulation often traps hidden ceiling-leak mold because it holds moisture against framing, drywall, and sheathing after a roof or plumbing leak.
You should inspect the full depth and perimeter of the insulation for dark staining, matting, and a damp or earthy odor.
Different insulation types, including fiberglass batts, blown-in cellulose, and spray foam, can conceal wet materials in distinct ways.
Check attic ventilation, because poor airflow slows drying and raises humidity, allowing mold to persist.
You’ll want to lift and separate insulation near leak paths so you can verify whether the substrate is dry and sound.
If you find localized contamination, treat the area as part of your home team’s moisture-control plan and document it clearly in the inspection report.
Drywall Seams
Drywall seams often concentrate ceiling-leak mold because joint tape, mud, and fasteners create narrow voids that hold moisture after a roof, plumbing, or condensation event.
You should inspect each seam for staining, swelling, blistering, and soft spots, especially where drywall installation met framing gaps or failed moisture barriers. Use a bright light and a moisture meter to trace hidden dampness beyond the visible line.
- Look for hairline cracks along taped joints.
- Check fastener heads for rust or dark halos.
- Probe any sagging seam for softened gypsum.
- Compare affected seams with dry, intact areas.
If you document these clues carefully, you’ll help your team isolate the leak path and confirm whether mold growth started behind the finish surface.
How Inspectors Test Ceiling Mold
Before an inspector confirms ceiling mold, they typically verify moisture sources and collect evidence from both the stain and surrounding materials.
You’ll usually see mold testing techniques such as visual mapping, moisture meter readings, surface tape lifts, and, when needed, air sampling. A qualified inspector documents humidity, temperature, and leak history, then compares affected areas with adjacent clean materials to isolate the problem.
Inspector qualifications matter because accurate sampling depends on proper calibration, sterile handling, and correct lab chain of custody.
You can expect the process to focus on whether growth is active, hidden, or only staining. Clear results help you understand the scope of contamination and decide whether repairs, drying, or further testing are warranted.
What a Mold Inspection Report Includes
A thorough inspection report records exactly what the inspector found, where the ceiling damage appears, and how it relates to moisture intrusion.
You’ll see a clear summary of affected rooms, visible staining, and suspected source pathways, so you can understand your place in the next steps.
The report should identify mold types observed or sampled, note building materials impacted, and connect findings to likely water entry points.
It also flags health effects tied to exposure, especially for sensitive occupants.
- location of leaks and ceiling sagging
- photos of staining, growth, and damage
- identified materials, mold types, and extent
- recommendations for repair, containment, and follow-up
How to Read Moisture and Air Test Results
Moisture test results show where hidden water is active, while air test results indicate whether spores are elevated indoors compared with outdoors. You should compare each reading with the inspector’s stated baseline and room location.
Elevated moisture levels in drywall, framing, or insulation confirm a leak-related condition, even if the surface looks dry. Air samples matter when indoor counts exceed outdoor counts or when specific mold types appear indoors in greater concentration.
Review units, thresholds, and any notes about temperature, humidity, or sampling method, because they affect interpretation. If values cluster near a ceiling stain, you’ve got a stronger indicator of active contamination.
Use both data sets together to judge air quality and to confirm whether the report supports targeted corrective action.
How Water Damage Spreads Ceiling Mold
When a ceiling leak starts, water usually follows the path of least resistance through drywall seams, insulation, and framing members, then spreads laterally before it becomes visible.
You’ll often see staining far from the water damage sources because gravity, capillary action, and hidden cavities move moisture across the assembly. As the material stays wet, mold can colonize paper-faced drywall, dust, and wood fibers within 24 to 48 hours.
- Brown rings around fasteners
- Soft, sagging gypsum board
- Darkened insulation edges
- Musty odor near joists
You can limit spread by fixing the source fast and applying mold prevention tips: dry the cavity, remove wet porous materials, and keep relative humidity low.
If you’re part of the same property team, consistent inspection helps everyone catch secondary damage early.
When You Need Emergency Mold Testing
If the leak has soaked hidden materials, produced a strong musty odor, or triggered visible growth on multiple surfaces, you need emergency mold testing to confirm the extent of contamination and guide next steps.
You should request same-day sampling when drywall, insulation, or framing stayed wet for more than 24 to 48 hours. Immediate testing also makes sense after HVAC contamination, repeated leaks, or symptoms that worsen indoors.
An inspector can collect air and surface samples and compare them with indoor reference levels. This emergency response helps you identify whether the contamination is localized or widespread.
It also clarifies health implications for anyone with asthma, allergies, or immune sensitivity. When you act quickly, you protect your household and stay aligned with a careful, informed repair plan.
Using the Report for Repairs and Claims
Once the inspector issues the mold report, you can use its findings to direct cleanup, determine which materials need removal, and support insurance or landlord claims.
Review moisture readings, affected zones, and species identification before you choose repair strategies. Match each action to the documented source of water intrusion, because precise records strengthen claim processes and reduce disputes.
Keep photos, estimates, and correspondence with the report in one file so you can track progress and show compliance.
- Mark damaged drywall, insulation, and trim for removal
- Confirm leak repair before rebuilding ceiling finishes
- Compare contractor bids against the report’s scope
- Submit dated evidence with each claim update
Frequently Asked Questions
How Much Does a Ceiling Mold Inspection Usually Cost?
You’ll usually pay $300–$800 for a ceiling mold inspection. Your mold inspection costs depend on pricing factors like square footage, sample count, lab fees, and accessibility, so you’ll want a detailed estimate before scheduling.
Can I Stay Home During a Ceiling Mold Inspection?
Yes, you can usually stay home during the inspection process if you avoid the affected room; however, limit mold exposure by following the inspector’s instructions and ventilating the area when they’re working.
Do Inspectors Test Behind Insulation and Drywall?
Yes, they often do, when access is possible. You’re opening hidden chambers in a house’s story; insulation challenges and drywall damage can conceal moisture, so inspectors may probe, cut, or use tools for verification.
How Long Does a Mold Inspection Report Take?
You’ll usually get your mold inspection report within 24 to 72 hours, depending on lab turnaround and the inspection process. If mold growth is extensive, detailed analysis can take longer, but you’ll stay informed throughout.
Are Ceiling Mold Inspections Covered by Homeowners Insurance?
Usually, you’re covered only if a sudden leak caused the mold; gradual damage often isn’t. You’ll need to review your insurance policies and start the claim process quickly, since exclusions and documentation requirements vary.
Conclusion
When you follow the ceiling leak mold inspection report guide, you turn a dark stain into a clear signal. You’ll see that moisture is the first spark, and your report is the lantern that reveals hidden growth in insulation, framing, and drywall. With accurate testing, you can trace the leak, confirm contamination, and plan repairs with confidence. Use the findings to document damage, support claims, and stop mold from spreading like shadow through your ceiling.
Recent Posts
What Is 24 Hour Water Damage Cleanup?
If you’re dealing with a water emergency, 24 hour water damage cleanup gives you immediate
5 Tips for Mold Inspection Reports
When you review a mold inspection report, you need to check more than just the
Why Get a Ceiling Leak Mold Report?
If you’ve had a ceiling leak, you need more than a visual check. A ceiling