
Contents
You may notice a slight ceiling issue where the finish has softened, but that small change can signal moisture intrusion and early mold growth. A Ceiling Leak Mold Inspection helps trace the leak source, identify hidden moisture, check for staining or sagging, and test affected materials before the damage spreads. Some findings are straightforward, while others depend on hidden insulation or lab analysis, and the difference can change your next step.
Key Takeaways
- Check for ceiling water damage signs like stains, peeling paint, sagging drywall, soft spots, and musty odors.
- Trace the leak source from roof, plumbing, or HVAC issues and document wet areas, drip points, and staining patterns.
- Test ceiling materials with a moisture meter and compare readings near damage with dry reference areas.
- Use DIY inspection for visible mold and dampness, but rely on professional sampling to confirm hidden contamination.
- After repairs, keep humidity below 60%, dry new leaks quickly, and inspect weekly for recurring mold or moisture.
What Causes Ceiling Leak Mold?
Ceiling leak mold forms when moisture enters ceiling materials and remains long enough for fungal growth to begin. You usually see it when roof failures, plumbing defects, or condensation let water persist in gypsum board, insulation, or wood framing.
Warm indoor air meeting cool surfaces can raise humidity and support mold growth. Small leaks often stay hidden, so you need to treat any recurring dampness as a risk factor. Poor ventilation can also trap moisture and worsen conditions.
To reduce exposure, you should apply preventive measures such as repairing leaks quickly, controlling indoor humidity, and sealing vulnerable joints. When you understand these causes, you can protect your space and stay aligned with others who value a clean, healthy indoor environment.
Check for Ceiling Water Damage Signs
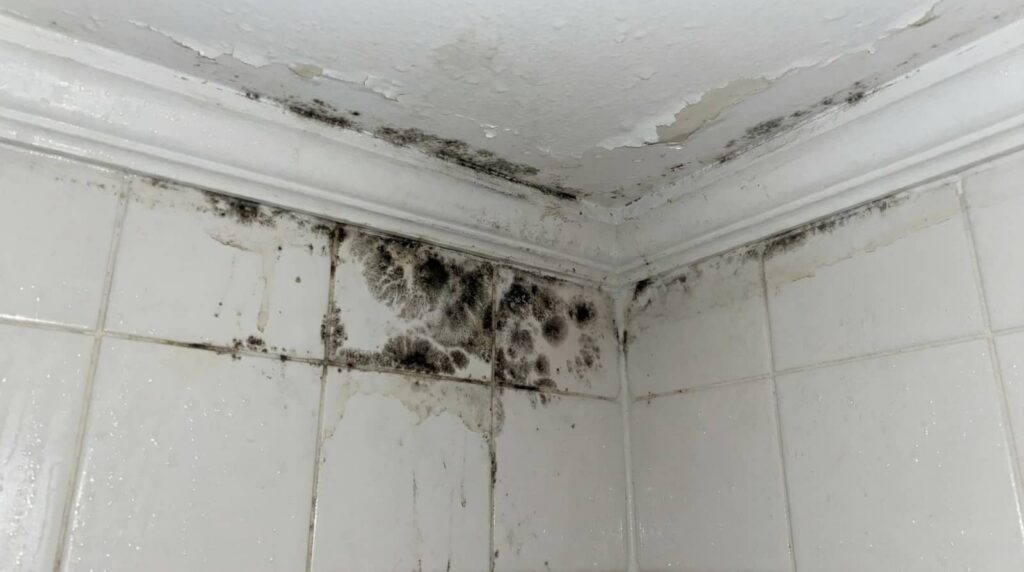
Once moisture gets into ceiling materials, you should look for visible damage before mold spreads. Inspect the surface for a water stain, peeling paint, sagging drywall, and hairline cracks that signal saturation.
You can compare affected areas with nearby dry sections to judge severity. Discoloration often appears yellow, brown, or gray, and it may expand at the edges. Soft spots, bubbling texture, and warped seams usually mean the ceiling has lost structural integrity.
If you notice a musty odor, treat it as a related warning sign. Document each defect with photos and notes so your team can track changes accurately.
Prompt ceiling repair limits further deterioration and helps you stay aligned with a safe, informed inspection process.
Inspect the Leak Source and Moisture
Trace the leak back to its source and confirm where moisture is entering the ceiling assembly. You should use leak detection methods that isolate plumbing, roofing, HVAC, and condensation paths without guesswork.
A focused moisture assessment helps you verify whether the source is active or intermittent, so you can act with confidence and stay aligned with your team’s inspection process.
- Map staining, drip points, and wet edges.
- Check adjacent fixtures, penetrations, and attic connections.
- Measure surface moisture at consistent intervals.
- Document conditions, timing, and source proximity.
If readings rise after system use or rainfall, the entry point is likely still active. You’re not just locating water; you’re establishing a clear, objective path from source to ceiling so your next steps stay efficient and defensible.
Test Ceiling Materials for Mold
You should inspect the ceiling surface for visual mold signs such as discoloration, staining, or fuzzy growth.
Then you should use a moisture meter to check the affected materials and confirm whether elevated moisture remains within the ceiling assembly.
If the readings are high, you’ll need to treat the material as potentially mold-contaminated and continue testing.
Visual Mold Signs
Discoloration on ceiling materials often provides the first visible clue of mold growth after a leak. You should inspect for dark specks, green or black patches, and fuzzy colonies along seams, joints, and fasteners. These signs can indicate active mold growth and related health risks for your household.
As a careful homeowner, you belong with others who value prompt, objective checks.
- Look for staining that spreads beyond the original leak area.
- Note powdery, slimy, or raised surface texture.
- Check paint blistering, peeling, or substrate softening.
- Compare affected and unaffected sections for pattern consistency.
When you document visual changes clearly, you strengthen your inspection and help decide whether further testing is warranted.
Moisture Meter Checks
After visual signs point to a possible leak problem, use a moisture meter to verify whether ceiling materials still hold excess water.
You should scan drywall, plaster, and insulation in a grid pattern, comparing readings near the stain with dry reference areas. Elevated values suggest active moisture sources or trapped water from a past event.
Check multiple points, because water often migrates beyond the visible damage. Record readings and note room humidity levels, since high ambient moisture can slow drying and distort results.
If the meter shows persistent elevation, you’ve confirmed conditions that support mold growth and need further drying or professional evaluation.
If readings normalize, continue monitoring for recurrence, especially after rain, plumbing use, or HVAC cycling.
Look for Hidden Mold in Insulation
Inspect the insulation layers behind the ceiling surface for concealed mold growth, especially where leak paths may have reached.
Check each layer for moisture stains, discoloration, or compression that can indicate trapped water.
If you find wet or stained insulation, treat it as a likely mold risk and document the affected area.
Inspect Insulation Layers
Even when the visible ceiling stain looks minor, you should check the insulation above it because moisture can soak deep into fiberglass, cellulose, or mineral wool and trap mold out of sight.
You need to compare insulation types and note whether moisture barriers still sit intact against framing. If the layer feels compressed, clumped, or brittle, treat it as suspect and document the location for your team’s records.
- Lift only a small section to preserve the assembly.
- Inspect seams, batts, and loose-fill depth for contamination.
- Verify the barrier hasn’t separated from joists or drywall.
- Replace any section with visible growth or degraded fibers.
This method helps you and your crew identify hidden contamination early, keep standards consistent, and maintain a safer shared work area.
Check for Moisture Stains
Moisture stains on ceiling materials often point to hidden mold in the insulation above, so you should map every discoloration before you disturb the area further.
Use moisture detection tools to compare suspect zones with dry reference areas, and record readings next to each stain.
During stain analysis, note ring edges, brown halos, and any softening, bubbling, or sagging that suggest prolonged wetting.
You should check joints, fasteners, and penetrations because leaks often travel away from the source.
If you find repeated staining patterns, you’re likely seeing active or past infiltration that supported mold growth.
Keep your inspection organized so you and your team can track changes, confirm risk, and decide whether removal, drying, or lab sampling is needed before closing the ceiling.
DIY Mold Checks vs Pro Testing
When you compare DIY mold checks with professional testing, the main difference is reliability: you can spot visible growth, staining, musty odors, and damp materials yourself, but only a qualified inspector can verify contamination levels and identify hidden spread behind the ceiling assembly.
- You can use basic inspection tools to document mold growth.
- You can confirm leak history and surface moisture.
- You can sample air or materials only with calibrated methods.
- You can reduce guesswork by hiring an inspector for objective data.
DIY checks help you act fast and stay informed, but pro testing gives you defensible measurements and a clearer scope.
If you want to protect your home and fit in with prepared property owners, combine both approaches when conditions look uncertain.
How to Interpret Mold Test Results
Mold test results should tell you three things: what was detected, where it was detected, and whether the findings match the leak pattern in your ceiling.
You should compare identified mold types with the report’s reference ranges, because a single spore count doesn’t confirm active damage. If surface samples show elevated growth near the stain but air samples don’t, your ceiling may hold localized contamination.
Different testing methods can produce different readings, so interpret each result in context, not isolation. You’re not looking for dramatic numbers; you’re looking for consistency between moisture history, visual staining, and lab data.
When the report is clear, you can move forward with confidence, knowing you’re reading the evidence like other informed homeowners do.
Prevent Mold After Ceiling Leak Repair
After you repair the leak, you need to remove the conditions that let mold return. Keep the ceiling assembly dry, verify the repair, and follow disciplined mold prevention strategies.
You’re protecting your home and joining the group of owners who control moisture early. Use post repair maintenance to confirm that no hidden dampness remains.
- Inspect the repaired area weekly for staining, peeling paint, or soft drywall.
- Measure indoor humidity; keep it below 60% with ventilation or dehumidification.
- Dry any new water intrusion within 24 to 48 hours, and replace saturated materials.
- Seal gaps around plumbing, fixtures, and roofing to limit future leaks.
Document each check, and retest if odor or discoloration appears. Consistent monitoring reduces recurrence and supports a stable, mold-resistant ceiling.
Frequently Asked Questions
What Health Symptoms Can Ceiling Mold Cause?
You can develop mold exposure symptoms like respiratory issues, allergy symptoms, and skin irritation; repeated exposure may trigger long term effects. You should use prevention strategies, including fixing leaks, improving ventilation, and removing contaminated materials promptly.
How Long Can Ceiling Leak Mold Stay Hidden?
It can stay hidden for months, sometimes years, if hidden moisture persists. You’ll be in the know when ceiling paint sags; mold growth often spreads unseen until you inspect cavities and test materials.
Can Ceiling Mold Spread to Other Rooms?
Yes, mold can spread to other rooms through airborne spores, HVAC systems, and shared walls. You should use moisture control solutions and mold prevention strategies to limit contamination and protect your home’s indoor environment.
Should I Replace Drywall After a Leak?
You should replace drywall after a leak if you see staining, sagging, or odor, like a hidden bruise. A proper leak assessment tells you whether drywall replacement’s needed, helping you protect your home and community.
How Soon Should Mold Testing Happen After Repair?
You should test 24–48 hours after repair, once materials are dry and stable. That repair timeline lets you verify mold remediation success, reduce false positives, and give your team clear, objective confirmation quickly.
Conclusion
If you find a ceiling leak, act fast to stop moisture, inspect the stain, and test affected materials before mold spreads. For example, a 2-foot bathroom leak above drywall can hide growth inside insulation even after the surface dries. You should compare DIY swabs with professional testing when results are unclear. After repairs, keep humidity low, fix drainage issues, and monitor the area so you prevent recurring mold and protect indoor air quality.
Recent Posts
24/7 Water Damage Cleanup Checklist
At 2 a.m., you notice water pooling under your laundry room wall, and you have
What Is 24 Hour Water Damage Cleanup?
If you’re dealing with a water emergency, 24 hour water damage cleanup gives you immediate
Ceiling Leak Mold Inspection Report Guide
If you’re dealing with a ceiling leak, you need to know how mold can develop,