
Contents
A ceiling stain can be a warning flag, signaling hidden water paths above. Ceiling Leak Mold Inspection starts by tracing the leak source, then inspecting discoloration for active mold, checking damaged drywall for insulation and backing issues, and testing air and surfaces for contamination when appropriate. Document moisture levels and photo evidence as you go, because the visible damage rarely tells the full story yet.
Key Takeaways
- Inspect directly above the stain for leak sources like plumbing, roof penetrations, HVAC condensate, or damaged joints.
- Check the stain edges for mold signs such as discoloration, fuzzy growth, or uneven spotting.
- Lift damaged drywall to find wet insulation, crumbling gypsum, separating paper, or rusted fasteners.
- Sample air and surfaces with proper PPE to compare indoor mold levels against outdoor conditions.
- Photograph stains, drips, and moisture readings, then track changes after rainfall or fixture use.
Find the Ceiling Leak Source
To find the ceiling leak source, inspect the area directly above the stain, then trace outward for signs of water intrusion such as damp insulation, rusted fasteners, warped drywall, or discoloration along framing members.
You should document each finding during leak detection so you can compare patterns and isolate the entry point. Check plumbing lines, roof penetrations, HVAC condensate routes, and nearby joints for active seepage or previous repairs.
During moisture assessment, use a calibrated meter to confirm elevated readings and distinguish incidental condensation from an ongoing leak. If you work methodically, you’ll narrow the source without guesswork and keep your inspection team aligned.
Mark affected areas, note the room location, and verify conditions after rainfall or fixture use to confirm the path.
Check Ceiling Stains for Mold
Inspect the ceiling stain closely for mold growth, especially along its edges, where moisture tends to linger longest.
You should look for discoloration, fuzzy patches, and uneven spotting that signal active colonies. Compare the stain’s color and texture to common mold types, such as black, green, or white growth, but don’t rely on appearance alone for confirmation.
Use a flashlight to reveal subtle surface changes and track whether the stain expands after rainfall or plumbing use. If you notice a musty odor, treat the area as suspect.
Document the stain’s size, shape, and location so your team can monitor changes together. These observations support practical prevention methods and help you respond quickly before the problem spreads.
Inspect Drywall and Insulation Damage
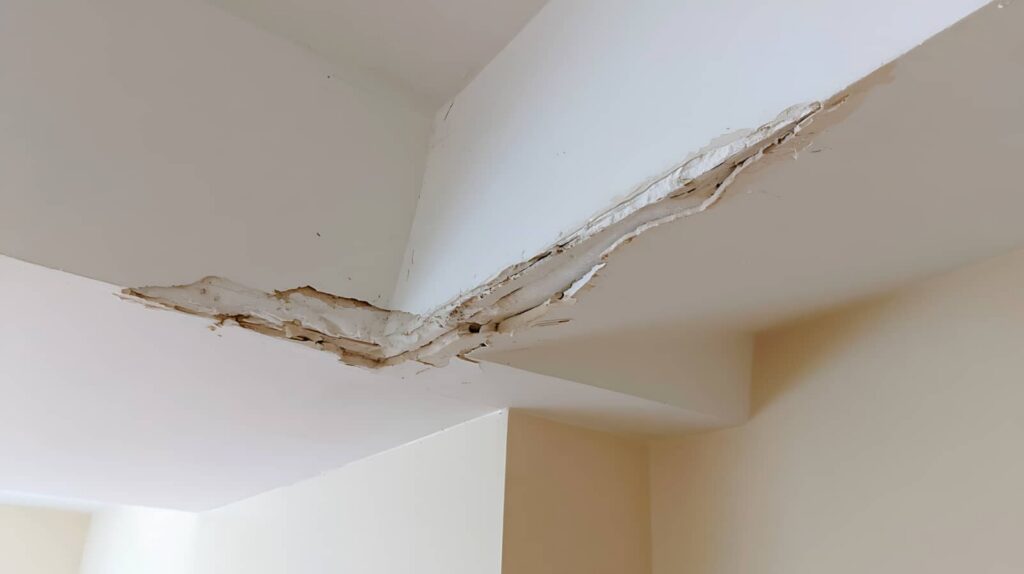
Lift a small section of damaged drywall, if safe to do so, and check the backing and insulation for dampness, staining, swelling, or deterioration.
You should compare the exposed area with adjacent material so you can isolate leak-related damage from older defects. If the gypsum core crumbles, the paper face separates, or fasteners rust, you likely need drywall replacement.
Examine insulation types carefully: fiberglass can mat down and hold moisture, while cellulose may clump, discolor, or lose loft.
Remove any saturated section that won’t dry fully, since trapped moisture can degrade nearby framing.
You belong in a methodical inspection process when you document findings, measure the affected area, and note where repair boundaries begin.
Test The Air And Surfaces For Mold
If you suspect active mold growth, you should test both the air and affected surfaces to confirm contamination and guide cleanup.
Use a calibrated air sampler to evaluate air quality in the ceiling zone, then collect surface swabs or tape lifts from visible spots and adjacent materials.
Compare results with outdoor or background samples so you can identify elevated spore loads and likely intrusion points. A lab can distinguish common mold types, which helps you judge whether the problem is isolated or widespread.
Wear proper PPE while sampling, and avoid disturbing colonies before collection.
If results show significant contamination, you’ll know your space needs targeted remediation and further evaluation from a qualified inspector.
Document Water Damage for Restoration
Photograph and log every sign of ceiling water damage before any cleanup begins, because detailed records support insurance claims and restoration planning.
You should capture wide shots, close-ups, stains, sagging drywall, bubbling paint, and active drips. Include dates, times, room locations, and moisture readings from meters if you have them.
Keep copies of contractor notes, invoices, and utility shutoff records in one file. This water damage assessment helps you and your remediation team track progression and choose the right drying method.
Strong restoration documentation also gives your insurance adjuster a clear timeline and can help your household stay aligned during repairs.
Store images and logs in cloud backup and a printed folder so your team can access them quickly.
Frequently Asked Questions
How Long Does Ceiling Mold Inspection Usually Take?
Usually, you’ll spend 30 to 90 minutes on the inspection process, though complex mold growth or concealed moisture can take longer. You’ll get faster results when you provide access, history, and clear site conditions.
Can Ceiling Mold Affect My Health Immediately?
Yes—ceiling mold can affect you immediately: you may notice symptoms exposure like coughing, eye irritation, or headaches. If you act now, you can reduce risk with prevention measures, and you’re not alone.
Should I Leave the Home During Mold Testing?
You usually don’t need to leave during mold testing, but you should follow home safety precautions. Ask about mold testing procedures, because some air sampling methods may briefly disturb spores and irritants.
How Much Does Professional Mold Inspection Cost?
You’ll usually pay $300–$700 for professional mold inspection; for example, a 1,500-square-foot home with moisture damage may cost $500. Prices vary by mold testing, inspection methods, and report complexity, so you’re not alone.
Do Insurance Policies Cover Ceiling Mold Damage?
Usually, you’re covered only if a sudden, accidental leak caused the mold. Review your policy’s insurance coverage carefully, because gradual damage is often excluded. You’ll likely need documented mold remediation to support any claim.
Wrap-Up
By tracing the leak, you stop mold from spreading like a hidden stain in the walls. Check ceiling discoloration closely, then inspect drywall and insulation for soft, damaged, or damp materials. Test air and surfaces to confirm contamination, and record moisture readings and photos to guide restoration. When you document each step carefully, you build a clear map of the damage, letting you target repairs and prevent future growth with precision.
Recent Posts
What Is 24 Hour Water Damage Cleanup?
If you’re dealing with a water emergency, 24 hour water damage cleanup gives you immediate
Ceiling Leak Mold Inspection Report Guide
If you’re dealing with a ceiling leak, you need to know how mold can develop,
5 Tips for Mold Inspection Reports
When you review a mold inspection report, you need to check more than just the