
Contents
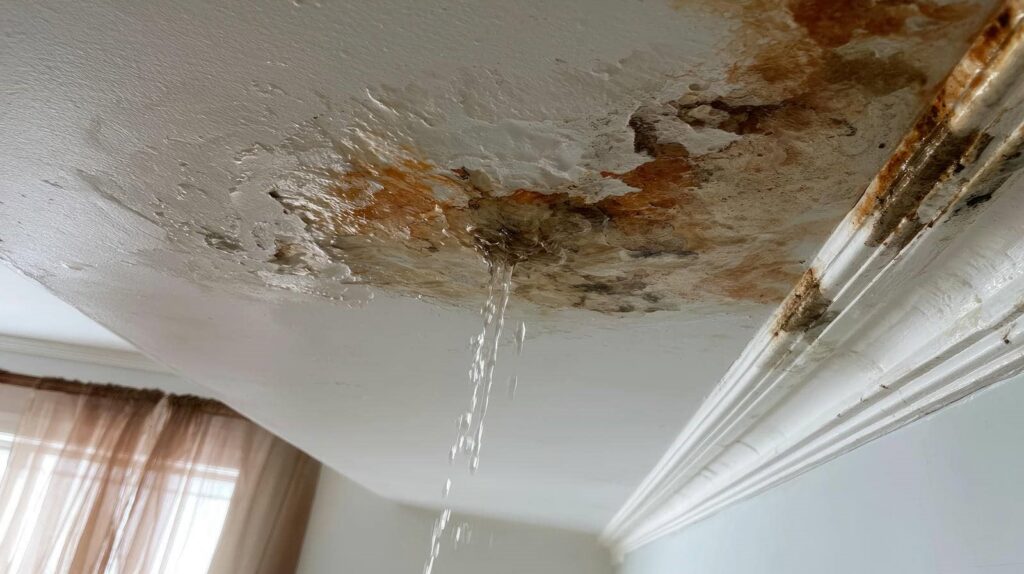
Ceiling Leaks can turn a small problem into a major repair fast. You should shut off the water and power, then move furniture and protect the floor before the damage spreads. Next, find the source, document what you see, and check for mold or hidden structural issues. Acting quickly when dealing with Ceiling Leaks can significantly reduce repair costs and help prevent more extensive water damage. What you do in the next few minutes can change the repair cost entirely.
Key Takeaways
- Shut off the water and power immediately if the leak is from plumbing or near electrical fixtures.
- Place buckets or tarps under the drip and move furniture, rugs, and electronics away.
- Inspect the attic, roof, and plumbing above the stain to find the leak source.
- Photograph and document all damage, wet areas, and repair details for reference.
- Remove wet drywall or insulation, dry the area quickly, and call a professional for major damage or mold.
Stop the Ceiling Leak Safely
Shut off the water supply right away if the leak is coming from plumbing, then place a bucket or tarp under the drip to catch runoff. You’ll protect nearby surfaces and buy yourself time to inspect the stain.
Move furniture, rugs, and electronics out of the area so moisture doesn’t spread. If you can safely reach the attic, check for wet insulation or active drips, but don’t step on damaged drywall.
Use a flashlight, gloves, and other emergency supplies to document the source. Mark the wet edge with tape so you can track changes.
These leak prevention tips help you stay calm and organized, and they keep you connected to a practical plan while you wait for repairs.
Shut Off Water and Power
Find your main water valve and shut it off to stop more water from entering the system.
Then switch off electrical power to the affected area at the breaker panel to reduce shock and fire risks.
If you can’t locate either control safely, contact your utility provider or an electrician right away.
Find Main Water Valve
Before you do anything else, locate your main water shutoff valve and turn it off to stop more water from entering the leak.
Check your main valve location near the meter, basement wall, utility closet, or where the supply line enters your home.
Know the common water valve types: a round wheel valve or a quarter-turn lever.
Turn the handle clockwise until it stops, or rotate the lever so it’s perpendicular to the pipe.
If the valve sticks, don’t force it; call your utility or a licensed plumber.
Keep the area clear so you can reach it fast next time.
You’re doing the right thing by controlling the source first, protecting your home and giving your household a safer, calmer next step.
Switch Off Electrical Power
If water is near lights, outlets, appliances, or your breaker panel, cut power to the affected area right away. Go to your breaker box and switch off the branch breaker for the leaking room, or shut off the main if you can’t isolate it safely.
Don’t touch wet switches, cords, or metal fixtures. Use a flashlight, not candles, so you avoid electrical hazards and fire risk.
If you see sparks, smell burning, or hear buzzing, step back and call an electrician or emergency service. These safety precautions help protect you and your household while you wait for repairs.
Keep everyone out of the wet area until power is verified off and the ceiling is secure. Your crew can handle cleanup faster once the space is safe.
Find the Source of the Ceiling Leak
Start by tracing the water path from the stain back to its origin, since the leak may appear far from the actual entry point.
Inspect the attic, roof deck, and plumbing lines above the damaged area. Look for wet insulation, dark wood, corrosion, drips, or gaps around vents, chimneys, and fasteners.
Use leak detection cues like active moisture, staining patterns, and pooling points to narrow the source. If the ceiling sits below a bathroom, check supply lines, drains, and fixtures.
Photograph each finding so you can match damage to likely repair methods later.
Stay systematic: test one area at a time, then confirm the leak’s route before you touch anything else.
When you find the entry point, mark it clearly and prepare the next fix with confidence.
Move Furniture and Protect Floors
Shift furniture out of the wet zone as soon as you can, giving priority to items directly under the leak and anything that can absorb water.
Do furniture relocation fast, but keep your movements controlled so you don’t spread moisture or strain yourself. Lift, don’t drag, when possible, and place pieces in a dry room with airflow.
Remove rugs, mats, and soft décor from the area. For floor protection, lay down plastic sheeting, waterproof tarps, or heavy towels where water might travel, then secure edges with tape if they won’t damage the surface.
Use trays or blocks under small items still in place. Stay organized, work with a partner if you can, and keep pathways clear so your team can move safely and protect the space together.
Document Ceiling Leak Damage
Photograph all visible damage from multiple angles, including stains, peeling paint, warped materials, and any affected belongings.
Note the exact leak locations and mark where water entered, spread, and pooled so you can track the source and extent.
Record each repair date and any contractor work, because clear documentation helps with insurance claims and follow-up inspections.
Photograph All Damage
Before you clean up or move anything, document every visible sign of the leak with clear photos. You’ll build a solid record for insurance claims and help estimate repair costs later. Use your phone’s highest resolution, turn on flash only if needed, and take wide shots plus close-ups. Capture damage from different angles so the full scope is obvious.
Photograph the ceiling stain, bubbling paint, and cracks.
Include wet floors, damaged furniture, and soaked materials.
Add a familiar object for scale, like a ruler or coin.
Save images in a labeled folder with the date.
Keep each photo sharp and unedited. If you’re part of a shared building, your neighbors may need the same proof, and a shared approach helps everyone feel supported.
Note Leak Locations
Map the leak locations as soon as possible so you can match the damage to a likely source. Mark each wet spot, stain edge, drip line, and ceiling seam on a simple floor plan, then note the room, ceiling height, and any nearby fixtures.
If you see spreading discoloration, sagging drywall, or active dripping, record it at once because the pattern helps you trace the path of water damage. Add arrows showing how moisture moves from one area to another, and keep your notes clear enough that you and your contractor can use them together.
This step supports leak prevention because it shows recurring weak points, hidden plumbing issues, and roof entry paths. Stay consistent, stay detailed, and you’ll build a shared record your household can trust.
Record Repair Dates
Record each repair date, the work performed, and who completed it so you can track whether the ceiling leak returns after a fix.
Keep a clear maintenance record with photos, receipts, and inspection notes. Your repair timeline helps you spot repeat failures, match repairs to weather events, and support any insurance claim.
When you log details, you’re building a shared system that keeps your home crew informed and confident.
- Note the date and time.
- Describe the damaged area.
- List materials and labor used.
- Save the contractor’s contact info.
Review entries after each storm or ceiling stain. If a new leak appears, compare it against past repairs and act fast.
A tidy record makes your next step easier and keeps you connected to the fix.
Dry Out Ceiling Leak Damage Fast
Dry out ceiling leak damage fast by stopping the water source, removing wet insulation or loose materials, and opening up the area so air can move freely.
Then set fans to push air across the wet surface and run a dehumidifier to pull moisture from the room.
If you can, lift nearby trim or access panels to improve airflow.
Keep the area warm, but don’t overheat it.
Check your work with a moisture meter until readings return to normal.
You’ll protect your home and keep your crew on track by following preventative maintenance habits and tight moisture control after every leak.
Seal the source, manage humidity, and monitor drying daily so you can move forward with confidence.
Check for Mold and Hidden Damage
Open the ceiling cavities and inspect the framing, insulation, and backing for moisture, staining, and soft spots.
Look for visible mold, musty odors, and any discoloration around joints, fasteners, and penetrations.
If you notice sagging, warped materials, or compromised wood, assess the hidden structural damage before you close the area back up.
Inspect Ceiling Cavities
Once the visible leak is under control, inspect the ceiling cavity above the stain for mold, wet insulation, damaged drywall, and rotted wood. You can do this safely with good lighting, a small access opening, and ceiling inspection techniques that keep the area tidy.
Use moisture detection tools to confirm hidden damp spots instead of guessing. Stay methodical so you and your crew don’t miss structural issues.
- Check insulation for clumping or sagging.
- Probe framing for soft or crumbly wood.
- Measure moisture around seams and fasteners.
- Photograph findings before you close the opening.
If you catch damage early, you’ll protect the space, reduce repair costs, and keep your home team on the same page.
Look For Mold
If the leak stayed active long enough to soak drywall, insulation, or framing, check for mold and hidden damage right away.
Look for discoloration, fuzzy growth, musty odor, and damp seams around the stain. Common mold types include green, black, and white growth, but color alone won’t confirm the risk.
You can use a flashlight and a mirror to inspect edges, vents, and trim where moisture lingers. If the area still feels cool or wet, keep monitoring it.
Avoid scrubbing dry surfaces, which can spread spores. Wear gloves, a mask, and eye protection if you open material.
Good prevention tips include drying within 24 to 48 hours, lowering indoor humidity, and fixing the leak source fast so your home stays healthier for everyone.
Assess Hidden Structural Damage
Even after the stain dries, the leak may have damaged drywall, insulation, ceiling joists, or framing behind the surface. You need to check for hidden hazards before you patch anything.
Look for sagging, soft spots, musty odors, rusted fasteners, and discoloration around seams. These signs can point to trapped moisture and mold growth. Protect your structural integrity by opening small inspection points if needed and using a moisture meter to confirm the area is dry.
- Press gently for flex.
- Inspect nearby attic or crawl spaces.
- Photograph damage for repairs.
- Call a pro if framing looks warped.
You’re not overreacting; you’re preventing bigger repairs and keeping your home safe for everyone inside.
Repair Burst Pipe Damage
First, shut off the water supply and relieve pressure in the line before you start any repairs.
Cut out the damaged section with a pipe cutter, then dry-fit a replacement using the same material and diameter.
Deburr edges, clean joints, and solder, glue, or crimp per code.
If the burst came from freezing, wrap nearby runs with pipe insulation so the repair doesn’t fail again.
Check adjacent fittings for stress cracks, then open the valve slowly and watch for leaks.
Tighten or remake any joint that seeps.
Keep a log of the repair for future plumbing maintenance, and inspect the line after the next full water cycle.
You’ll protect your home and your crew when you fix the failure cleanly and methodically.
Restore Drywall, Paint, and Insulation Damage
Remove any wet drywall, insulation, and trim that can’t dry within 24 to 48 hours. You’ll protect the cavity, limit mold growth, and keep your ceiling repair on track.
After demolition, inspect framing and sheathing for staining or softness. If surfaces are sound, let them dry fully before you patch.
Use drywall repair techniques to cut clean edges, install backing, tape joints, and apply joint compound in thin coats. Choose insulation replacement that matches the original R-value and fits tightly without compression.
Then prime and paint with a stain-blocking product so the finish blends in.
- Remove damaged material
- Dry framing completely
- Replace insulation
- Finish, prime, and paint
Call a 24-Hour Water Damage Team
When ceiling leaks spread beyond a small stain, call a 24-hour water damage team right away. You need emergency services that can inspect moisture, stop active intrusion, and document damage before it worsens.
A trained crew will use meters, thermal imaging, and containment tools to find hidden water in joists, insulation, and wall cavities. They’ll start water restoration fast, removing standing water, drying materials, and reducing mold risk.
You don’t have to manage this alone; reliable pros guide you through the next steps and help protect your home and your peace of mind.
Choose a team with proven response times, insurance support, and clear communication so you can feel taken care of and get back to normal sooner.
Frequently Asked Questions
How Do I Know if the Ceiling Is About to Collapse?
Look for sagging, wide cracks, bulging drywall, popping noises, or fresh water stains. During a ceiling inspection, you’ll assess structural integrity; if movement worsens, evacuate immediately and call a professional.
Can Ceiling Leaks Come From HVAC Condensation?
Yes—cool airflow and dripping metal can meet overhead, creating leaks from HVAC condensation. You’ll need HVAC maintenance, check condensation issues, fix insulation problems, and improve leak prevention so you don’t join the damp-ceiling crowd.
Will Homeowners Insurance Cover All Leak-Related Repairs?
No, homeowners insurance usually won’t cover all leak-related repairs. You’ll need a leak assessment, then file an insurance claim for sudden damage; wear, neglect, and source repairs often stay your responsibility.
How Long Should I Wait Before Repainting the Ceiling?
Wait until your ceiling’s completely dry—usually 24–72 hours, longer if damage was heavy. Then inspect for staining, complete paint preparation, and prime before repainting. You’ll get a smoother, lasting finish and avoid trapping moisture.
When Should I Replace a Water-Stained Ceiling Completely?
Replace it when the stain stays after drying, the material sags, crumbles, or you spot mold growth or structural damage. You’ll protect your home and fit in with a safer, well-maintained space.
Final Thoughts
When the drip finally stops, don’t relax yet—the real damage may be hidden above you. You’ve shut off the water, cut the power, moved what matters, and traced the source. Now watch for soft drywall, warped framing, and mold stains that creep in the shadows. Repair the leak, dry the space fast, and restore every layer with care. If the ceiling still feels uncertain, call a 24-hour water damage team before trouble returns.
Recent Posts
What Is 24 Hour Water Damage Cleanup?
If you’re dealing with a water emergency, 24 hour water damage cleanup gives you immediate
Ceiling Leak Mold Inspection Report Guide
If you’re dealing with a ceiling leak, you need to know how mold can develop,
5 Tips for Mold Inspection Reports
When you review a mold inspection report, you need to check more than just the