Contents
After a flood, tackling mold growth can feel overwhelming, but you don’t need a hefty budget to address it effectively. By evaluating the damage and understanding the extent of mold growth, you can implement practical mold remediation strategies to mitigate the problem. From DIY removal techniques to natural remedies, there are several approaches that can help you regain control of your environment. Let’s explore the essential steps you can take to guarantee your space is safe and mold-free.
Key Takeaways
- Immediately dry out affected areas using fans and dehumidifiers to reduce moisture that promotes mold growth.
- Clean small mold patches with a mixture of water and vinegar or hydrogen peroxide for cost-effective removal.
- Remove and replace porous materials like drywall or insulation that are heavily contaminated with mold.
- Ensure proper ventilation and humidity control to prevent future mold growth in flood-affected areas.
- Educate household members about mold prevention techniques to maintain a healthier living environment post-remediation.
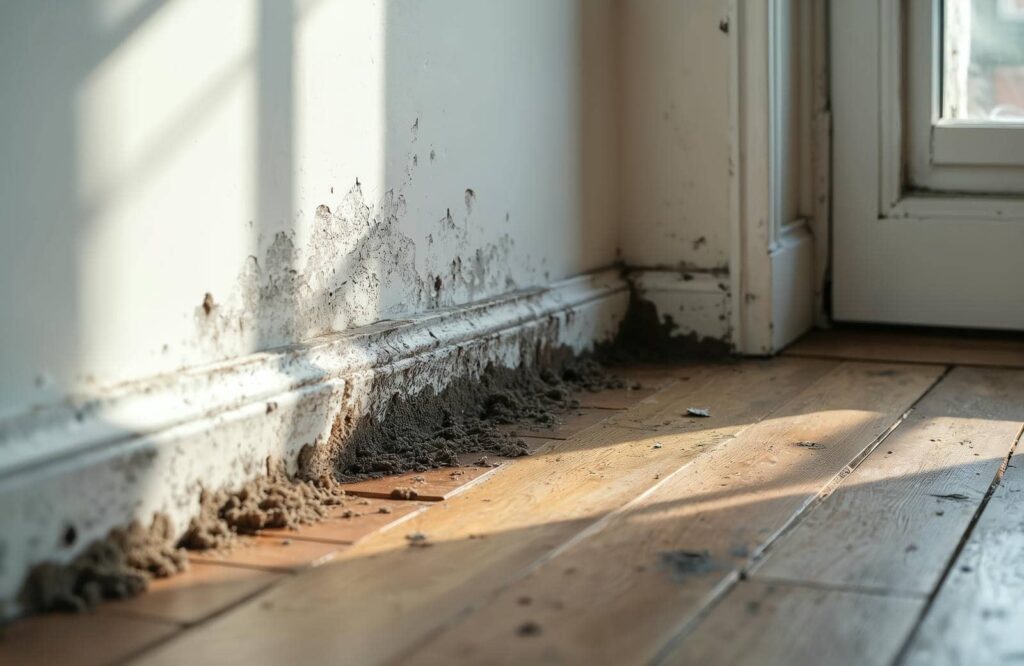
Assessing the Extent of Mold Growth
When you suspect mold in your home, it’s essential to evaluate the extent of the growth before taking action. Start by employing effective mold identification methods. Look for visible signs like discoloration on walls, ceilings, or surfaces.
Use your senses; if you notice a musty smell, it often indicates hidden mold. Next, conduct a moisture source evaluation. Identify areas with high humidity or water damage, such as leaky pipes or damp basements. You can use moisture meters to measure levels accurately, ensuring you’ve pinpointed the problem areas.
Keep in mind that mold thrives in damp conditions, so addressing these sources is critical for successful remediation. Document your findings, as this information will guide you in determining the best course of action.
Essential Safety Precautions
When tackling mold remediation, wearing protective gear is essential to safeguard your health from harmful spores.
Additionally, ensuring proper ventilation during the process helps minimize exposure and keeps the area safe.
Protective Gear Importance
Although you might be enthusiastic to tackle mold remediation, prioritizing safety through proper protective gear is essential.
Wearing the right protective gear types, such as gloves, masks, and goggles, can help prevent exposure to harmful mold spores. This isn’t just about comfort; safety gear benefits include reducing the risk of respiratory issues and skin irritations, ensuring you can work efficiently without health concerns.
By equipping yourself with the appropriate gear, you’re protecting your health and setting an example for others in your community.
Remember, effective mold remediation starts with safeguarding yourself, allowing you to focus on the task at hand and contribute positively to the recovery process.
Prioritizing safety fosters a sense of belonging in your shared environment.
Ventilation During Remediation
Proper ventilation is a key factor in effective mold remediation, especially after you’ve equipped yourself with protective gear.
To ensure safety and efficiency, prioritize air circulation in the affected areas. Opening windows and doors can help create a flow of fresh air, which is essential for diluting airborne spores. Use fans to boost air movement, directing moist air outside. This aids in moisture control and reduces the risk of inhaling harmful particles.
Consider using dehumidifiers to further lower humidity levels, as mold thrives in damp conditions.
Remember, maintaining good ventilation protects your health and speeds up the remediation process, making it more effective and budget-friendly.
Stay safe and proactive in your mold remediation efforts.
DIY Mold Removal Techniques
While tackling mold issues yourself can seem overwhelming, several effective DIY techniques can help you reclaim your space without breaking the bank.
Start by identifying areas with mold growth. Use a mixture of water and vinegar or hydrogen peroxide to scrub surfaces. These solutions kill mold and prevent future infestations.
For porous materials like drywall, consider removing and replacing them, as mold can penetrate deeply. Always wear protective gear, including gloves and masks, to safeguard your health during this process.
After cleaning, improve your home maintenance by ensuring proper ventilation and controlling humidity levels. Dehumidifiers can be a wise investment, helping to keep moisture at bay.
Utilizing Natural Remedies
When tackling mold issues, natural remedies can be both effective and budget-friendly.
Vinegar serves as a powerful mold remover, while baking soda eliminates mold and absorbs moisture.
Additionally, incorporating essential oils can add antimicrobial properties, enhancing your overall remediation efforts.
Vinegar as Mold Remover
Vinegar, a common household staple, offers a powerful yet budget-friendly solution for tackling mold. Its acetic acid content gives vinegar remarkable mold-fighting properties, making it effective in breaking down mold spores.
To use vinegar for mold removal, simply apply it undiluted directly onto the affected area and let it sit for at least an hour. Wiping it clean afterward will help guarantee thorough removal.
Beyond immediate remediation, vinegar plays a role in mold prevention by creating an environment where mold struggles to thrive. Regularly cleaning surfaces with vinegar can deter future infestations, allowing you to maintain a healthier home.
Embracing this natural remedy saves money and fosters a sense of community in tackling mold issues together.
Baking Soda Benefits
After exploring vinegar’s effectiveness in mold removal, it’s time to contemplate another powerful natural remedy: baking soda.
This versatile substance isn’t just for baking; it plays an essential role in combating mold. Baking soda’s natural moisture absorption properties help prevent mold growth by keeping environments dry.
When combined with water, it forms a paste that you can apply to affected areas, effectively eliminating mold spores and odors. Simply scrub, rinse, and let the area dry.
Plus, using baking soda is budget-friendly and safe for your family and pets, making it an ideal choice for mold remediation.
Essential Oils Usage
Essential oils offer a natural and effective way to combat mold in your home. By harnessing their powerful properties, you can create essential blends that target mold while also providing aromatherapy benefits.
Tea tree oil, for instance, has antifungal qualities that can help eliminate mold spores. Combine it with lavender oil, known for its soothing scent, to enhance your home’s atmosphere.
Simply mix a few drops of each oil with water in a spray bottle, and apply it to affected areas. Not only will this method help reduce mold, but it’ll also fill your space with inviting aromas.
Embracing essential oils connects you to a community that values natural solutions, making your home a healthier and more welcoming environment.
Effective Cleaning Solutions
While tackling mold issues, employing effective cleaning solutions is essential to guaranteeing a thorough remediation.
First, gather your cleaning supplies—distilled white vinegar, baking soda, and hydrogen peroxide are excellent, budget-friendly options. These natural ingredients combat existing mold and promote mold prevention.
Start by mixing equal parts of vinegar and water in a spray bottle, applying it directly to the affected areas. Let it sit for at least an hour before scrubbing with a brush.
For tougher spots, sprinkle baking soda over the area and then spray vinegar on top; this creates a bubbling reaction that lifts the mold away.
Finally, use hydrogen peroxide to disinfect surfaces and ensure no spores linger.
Preventing Future Mold Growth
To effectively prevent future mold growth, it’s crucial to address the conditions that foster its development.
Start by implementing moisture control measures in your home. Keep humidity levels below 60% by using dehumidifiers and ensuring proper ventilation, especially in damp areas like basements and bathrooms.
Consider investing in mold-resistant materials when renovating or repairing your space. These materials can greatly reduce the risk of mold taking hold, giving you peace of mind.
Regularly inspect your home for leaks and address any plumbing issues promptly. Remember, even small amounts of water can lead to mold growth if left unchecked.
Finally, educate yourself and your family about mold prevention techniques. Creating a culture of awareness in your household can foster a sense of belonging and responsibility towards maintaining a healthy living environment.
When to Seek Professional Help
How can you tell when it’s time to call in the experts for mold remediation? If you notice persistent mold symptoms like coughing, sneezing, or skin irritation, it’s vital to act.
These signs could indicate more than just surface mold; they can lead to serious health risks, especially for those with respiratory issues or weakened immune systems.
When mold covers an area larger than 10 square feet, it’s best to seek professional help. DIY methods may not effectively eliminate the problem and could expose you to further health risks.
Additionally, if you’re dealing with mold in hard-to-reach areas, such as behind walls or under flooring, professionals have the tools and expertise to address these situations safely.
Trust your instincts—if you’re unsure about the extent of the mold or how to manage it, reaching out to the experts can provide peace of mind and ensure a safer living environment for you and your loved ones.
Frequently Asked Questions
Can I Use Bleach to Kill Mold Effectively?
You can’t rely solely on bleach for effective mold removal. While it kills surface mold, it doesn’t penetrate porous materials, leaving mold spores behind. Consider alternative methods for thorough remediation and long-term prevention instead.
How Long Does It Take for Mold to Grow After Flooding?
Mold can start growing within 24 to 48 hours after flooding. To minimize risks, take post-flood precautions like drying out affected areas quickly and maintaining low humidity levels in your home for the best results.
Is Mold Removal Covered by Homeowners Insurance?
Think of mold as an uninvited guest; homeowners’ insurance can sometimes cover its removal. Check your homeowners’ policy for mold insurance coverage specifics, as it varies. Always confirm with your provider to understand your options.
What Should I Do With Moldy Belongings?
You should assess moldy belongings carefully. Dispose of moldy furniture to prevent health risks, but consider salvaging personal items if they can be cleaned thoroughly. Prioritize safety and restoration over sentiment in decision-making.
Are There Any Health Risks From Mold Exposure?
Yes, mold exposure can cause symptoms like sneezing, coughing, and skin irritation. To prevent issues, you should control humidity, guarantee proper ventilation, and promptly address any water damage in your space. Stay proactive about your health!
Summary
Tackling mold after flooding doesn’t have to be overwhelming or costly, just like piecing together a puzzle. By evaluating the damage, taking safety precautions, and using DIY techniques, you can effectively manage mold growth on your own. Remember to utilize natural remedies and maintain moisture control to prevent future issues. However, if the problem persists or worsens, don’t hesitate to seek professional help. Your health and safety should always come first.
Recent Posts
Top Dehumidification Techniques for Flood Recovery
When dealing with flood recovery, effective dehumidification is essential to prevent further damage. You need
7 Top Tips for Drying Water Damage
Did you know that nearly 14,000 people experience a water damage emergency every day in
What Steps Remove Mold After Water Damage?
When dealing with mold after water damage, it’s vital to start with a thorough assessment