Contents
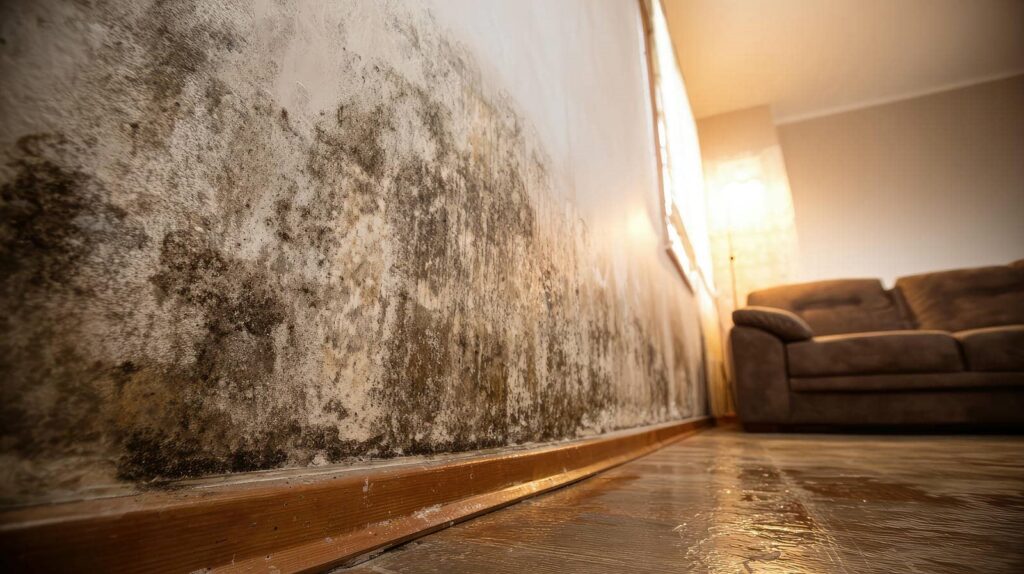
Many homeowners underestimate the speed at which mold can infiltrate their living spaces after a flood. If you don’t act fast, you could face serious health risks and costly repairs. Understanding how to effectively manage mold remediation is essential. From evaluating water damage to ensuring proper ventilation, each step plays an important role in safeguarding your home. Let’s explore the necessary tips to help you tackle this challenge effectively.
Key Takeaways
- Conduct a thorough assessment of water damage to identify affected areas and document findings for remediation planning.
- Ensure proper ventilation by opening windows and using fans to reduce humidity and promote air circulation.
- Remove all water-affected materials, including carpets and drywall, to prevent mold growth and ensure safe disposal.
- Use mold-specific cleaning solutions containing fungicides to effectively eliminate any existing mold spores.
- Monitor for recurrence by conducting regular inspections and maintaining humidity levels below 60% to prevent future mold issues.
Assess the Extent of Water Damage
Before you begin the mold remediation process, it’s crucial to assess the extent of water damage in your home.
Start with a thorough water damage assessment to identify affected areas. Look for visible signs like discoloration on walls, sagging ceilings, or warped flooring. These indicators help in your damage severity evaluation, guiding you on where to focus your efforts.
Next, check for hidden moisture in less obvious places, such as behind appliances or inside cabinets.
Using a moisture meter can provide precise readings, ensuring you don’t overlook any critical areas. Document your findings meticulously; this will assist in formulating an effective remediation strategy.
Ensure Proper Ventilation
To effectively combat mold growth after a flood, ensure proper ventilation in your space.
Open windows and doors to promote air circulation, and strategically use fans to enhance airflow.
This combination helps reduce humidity levels, making it less conducive for mold to thrive.
Open Windows and Doors
Opening windows and doors is essential for ensuring proper ventilation during mold remediation after a flood. By doing this, you promote air circulation, which helps to reduce humidity levels and inhibit mold growth.
Stale, damp air can exacerbate the situation, allowing mold spores to thrive. Fresh air coming in and old air moving out creates a balanced environment, vital for effective remediation.
Make sure to open as many windows and doors as possible to encourage cross-ventilation. This simple step helps lower moisture levels, making it harder for mold to establish itself.
Use Fans Effectively
Using fans effectively is essential for enhancing airflow and accelerating the drying process after a flood.
Start by strategically positioning your fans to optimize fan placement; aim them toward the wet areas to create a powerful airflow direction that pushes moisture out.
Make sure to create cross-ventilation by placing fans in opposing corners of the room. This setup helps circulate air and speeds up drying, reducing the risk of mold growth.
If possible, use exhaust fans in windows to expel humid air outdoors.
Remember, balancing your fan placements and ensuring the right airflow direction can greatly impact the effectiveness of your drying efforts.
Stay proactive, and you’ll foster a healthier environment for you and your loved ones.
Remove Affected Materials
Once floodwaters recede, it’s vital to promptly remove affected materials to prevent mold growth. Mold can develop within 24 to 48 hours after flooding, so acting quickly is imperative.
Start by identifying all materials that absorbed water, such as carpets, drywall, and insulation. If these items show signs of dampness or damage, they need to be discarded. For porous materials, like upholstery or mattresses, it’s often best to replace them entirely, as cleaning may not eliminate all mold spores.
Ensure you wear appropriate protective gear, including gloves and masks, to safeguard yourself from potential allergens.
As you remove these affected materials, properly seal them in plastic bags to minimize the spread of mold spores. Dispose of them according to local regulations.
Use Mold-Specific Cleaning Solutions
After removing affected materials, it’s time to tackle any remaining surfaces where mold might thrive.
Using mold-specific cleaning solutions is essential for effective remediation. Look for products that contain fungicides designed to eliminate mold spores and prevent future growth. Common recommendations include hydrogen peroxide, vinegar, or commercial mold removers, all of which can be effective when applied correctly.
Incorporating mold prevention strategies, like ensuring proper ventilation and controlling humidity levels, can enhance the effectiveness of your cleaning efforts.
When selecting your cleaning products, always check for safety ratings and follow manufacturer instructions for best results.
Dry Out the Area Thoroughly
To effectively dry out the area after a flood, start by removing any standing water immediately.
Once the water is cleared, use dehumidifiers to lower humidity levels and prevent mold growth.
This two-step approach is vital in creating an environment that discourages mold formation.
Remove Standing Water
As soon as floodwaters recede, it’s vital to remove any standing water to prevent mold growth.
Efficient water extraction is imperative for successful flood prevention, so take action quickly.
Here are four steps to guide you:
Use a Pump: If there’s substantial water, consider using a submersible pump for faster removal.
Siphon Water: For smaller areas, a siphon can effectively clear out standing water.
Mop Up: After draining, use mops or rags to soak up remaining moisture.
Dispose of Water Properly: Confirm that you’re disposing of the water safely and according to local regulations.
Taking these steps promptly will greatly reduce the risk of mold growth and help restore your space quickly.
Use Dehumidifiers Effectively
Utilizing dehumidifiers effectively is crucial for thoroughly drying out an area after flooding.
Start by strategically considering dehumidifier placement; position units in the most affected areas to maximize moisture removal. Make sure that air can circulate freely around the units, avoiding obstructions.
Monitor the humidity levels regularly, aiming for a range below 60% to achieve ideal humidity control. If you’re dealing with larger spaces, multiple dehumidifiers may be necessary for even distribution.
Don’t forget to empty the water collection tanks frequently, as full tanks can hinder performance.
Monitor for Recurrence
While you’ve taken significant steps to remediate mold after a flood, ongoing vigilance is essential to prevent its return.
Implementing effective monitoring techniques will help you identify potential issues before they escalate. Here are four preventive measures to take into account:
Regular Inspections: Check areas prone to moisture, like basements and bathrooms, for signs of mold or dampness.
Humidity Monitoring: Use a hygrometer to keep indoor humidity levels below 60% to discourage mold growth.
Airflow Management: Ensure proper ventilation in all rooms, especially in areas with water sources, to facilitate airflow.
Quick Response: Address any leaks or water damage immediately to minimize moisture accumulation, which can trigger mold recurrence.
Consult With Professionals
Consulting with professionals can be essential, especially when dealing with extensive mold issues after a flood. These experts have the necessary training and experience to identify the specific types of mold in your home using advanced mold identification techniques.
They can assess the extent of the contamination and recommend effective remediation strategies tailored to your situation.
Ignoring mold can lead to significant health risks, including respiratory problems and allergic reactions. Professionals not only help in removing mold safely but also assist in preventing future growth.
They can evaluate your home’s ventilation and moisture levels, ensuring the environment is less conducive to mold.
While DIY efforts might seem tempting, the potential dangers of improper handling can outweigh the benefits. By consulting with qualified professionals, you’re not just protecting your property; you’re safeguarding your health and that of your loved ones.
Prioritize expertise to ensure a thorough and safe mold remediation process.
Frequently Asked Questions
How Long Does It Take for Mold to Appear After Flooding?
Mold can appear within 24 to 48 hours after flooding, depending on moisture levels and warmth. Understanding this mold growth timeline helps you act quickly in the flood aftermath to prevent extensive damage.
Can I Stay in My House During Mold Remediation?
You can’t be too careful; staying out during mold remediation procedures is best for your safety. Mold spores can spread easily, so prioritize your health and let professionals handle the cleanup while you stay safe.
What Are the Health Risks Associated With Mold Exposure?
Mold exposure can lead to various health symptoms, including respiratory issues, allergies, and skin irritations. Different mold types may exacerbate these symptoms, particularly for those with existing health conditions or weakened immune systems.
How Can I Prevent Mold Growth After a Flood?
To prevent mold growth after a flood, dry out your space quickly, use mold prevention techniques like dehumidifiers, and implement flood recovery strategies such as sealing leaks and improving ventilation. Stay proactive and vigilant for success.
Is It Safe to Use Bleach for Mold Remediation?
Using bleach for mold remediation isn’t always safe; its effectiveness is limited to non-porous surfaces. Consider mold alternatives like vinegar or hydrogen peroxide, which can be safer and more effective for porous materials.
Conclusion
In the aftermath of a flood, acting quickly is your shield against the creeping shadows of mold. By evaluating the damage, ensuring ventilation, and removing affected materials, you lay the groundwork for a healthier home. Using specialized cleaning solutions and drying out the area thoroughly will help you reclaim your space. Keep a watchful eye on moisture levels to prevent recurrence. If needed, don’t hesitate to call in the experts—better safe than sorry in this battle against decay.
Recent Posts
5 Best Mold Remediation Techniques for Basements
If you’re dealing with mold in your basement, it’s important to understand the best mold
What Are Quick Tips for Basement Water Cleanup?
When dealing with basement water cleanup, it’s essential to act quickly and safely. Start by
Essential Tips for Emergency Basement Water Cleanup
When facing water intrusion in your basement, acting swiftly is essential. First, assess the situation